You're standing in a garage or hallway, new grips in hand, pulling at an old grip that hasn't moved a millimetre. Your palm hurts, the rubber is twisting, and you're wondering whether to pull harder or reach for a screwdriver. Stop there. Learning how to remove bike grips starts with choosing the right method for your grip type, whether you'll reuse it, and what your bar is made of.
Table of Contents
- Identify Your Grip Type Before You Pull
- Tools to Have Ready and What to Avoid
- How to Remove Lock-On Grips Step by Step
- How to Remove Push-On Rubber and Foam Grips
- Handling Stuck, Glued or Disposable Grips
- Clean the Bar and Fit Your New Grips
Identify Your Grip Type Before You Pull
Find your grip in this chart first, then follow its first method.
| Grip type | How it attaches | Usually reusable | First method to try |
|---|---|---|---|
| Lock-on (clamp) | Clamp bolt pinches the grip onto the bar end | Yes | Loosen clamp bolt with a 3 or 4 mm hex key |
| Slide-on rubber (push-on) | Tight friction fit over the grip area | Usually yes | Wet release with isopropyl alcohol or water |
| Foam | Friction fit, sometimes with adhesive on older bars | Yes, if not glued | Twist and pull by hand, then wet release |
| Silicone | Friction fit with a tacky surface | Yes | Water or window cleaner, or compressed air |
| Glued or bonded | Adhesive bonds grip to bar | Rarely | Hand twist first, then lengthwise cut if discarding |
Check the Grip Area Diameter
Most flat and mountain-bike handlebars use a 22.2 mm (7/8-inch) diameter in the grip area, while road drop handlebars commonly use a 23.8 mm (15/16-inch) diameter, according to the bicycle handlebar standard overview. That grip area is what sets the tight stretch fit, not the larger stem clamp in the centre. A modern bar can measure 31.8 mm at the stem and still take a 22.2 mm grip at the end.
A slide-on grip is made slightly small so it grips the bar by friction alone. Pulling without first creating an air or liquid gap can tear the rubber or strain the bar. A lock-on grip works differently, because a metal clamp does the holding and the sleeve underneath may be loose once you release it.
Basic rule: Never treat a clamped lock-on grip like a glued slide-on grip, and never force a tight grip before you've created a controlled gap.
Run a Three-Part Check
- Look for clamp bolts: Check both ends of the grip for a small hex bolt on a metal collar. If you find one, you've got a lock-on.
- Twist by hand: Try to rotate the grip a quarter turn. Rotation tells you the friction seal can break.
- Pull gently: Tug toward the bar end without yanking. Any slide at all means hand or wet methods should work.
A grip that won't rotate or slide after that check is probably glued, bonded, or corroded underneath. Don't add force yet. Identify it correctly and you'll pick a method that saves the grip, if it's worth saving, and leaves the bar unmarked.
Tools to Have Ready and What to Avoid
Match the tools to the grip and bar before starting. A grip you plan to reuse needs a gentler release than one headed for the bin, and carbon or painted bars can be marked by metal tools. The RMDBike's published installation guide identifies four categories for removing old grips: cutting tools, lubricant, a flat screwdriver or thin wire, and replacement grips. Have the items for your chosen method ready before you begin.
- Isopropyl alcohol or water: Use a spray bottle to help release a push-on grip. Alcohol evaporates and leaves little residue.
- Blunt plastic or wooden shim: Lifts a grip edge without scratching carbon or paint, and it's the safer choice for any prying at the grip edge.
- 3 and 4 mm hex keys: For clamp bolts on lock-on grips.
- Rag and eye protection: Use the rag to wipe the bar and wear eye protection if using compressed air.
- Compressor or ball pump: Optional. Use a narrow nozzle and low, controlled pressure.
Leave locking pliers aside. They can crush a reusable grip and scar the bar. The vice grip basics from Value Tools Co explain how clamping force works, but gripping the rubber or bar is the wrong use here.
What to Leave on the Shelf
Avoid gasoline, carburetor cleaner, and brake cleaner on rubber of unknown composition. Strong solvents can swell a grip, attack painted finishes, or leave residue that prevents a new grip from seating securely. Keep oil off the whole grip too. It can migrate under brake levers and is difficult to remove fully.
Keep tools clear of brake cables, shifter housings, and carbon surfaces. A slip can cut a housing or groove the bar, damage that costs more to fix than replacing a grip. Move a lever out of the way before working if it blocks your access.
How to Remove Lock-On Grips Step by Step
Lock-on removal is the simplest job here, provided you release the clamp before you pull anything. The overview below shows the core sequence.
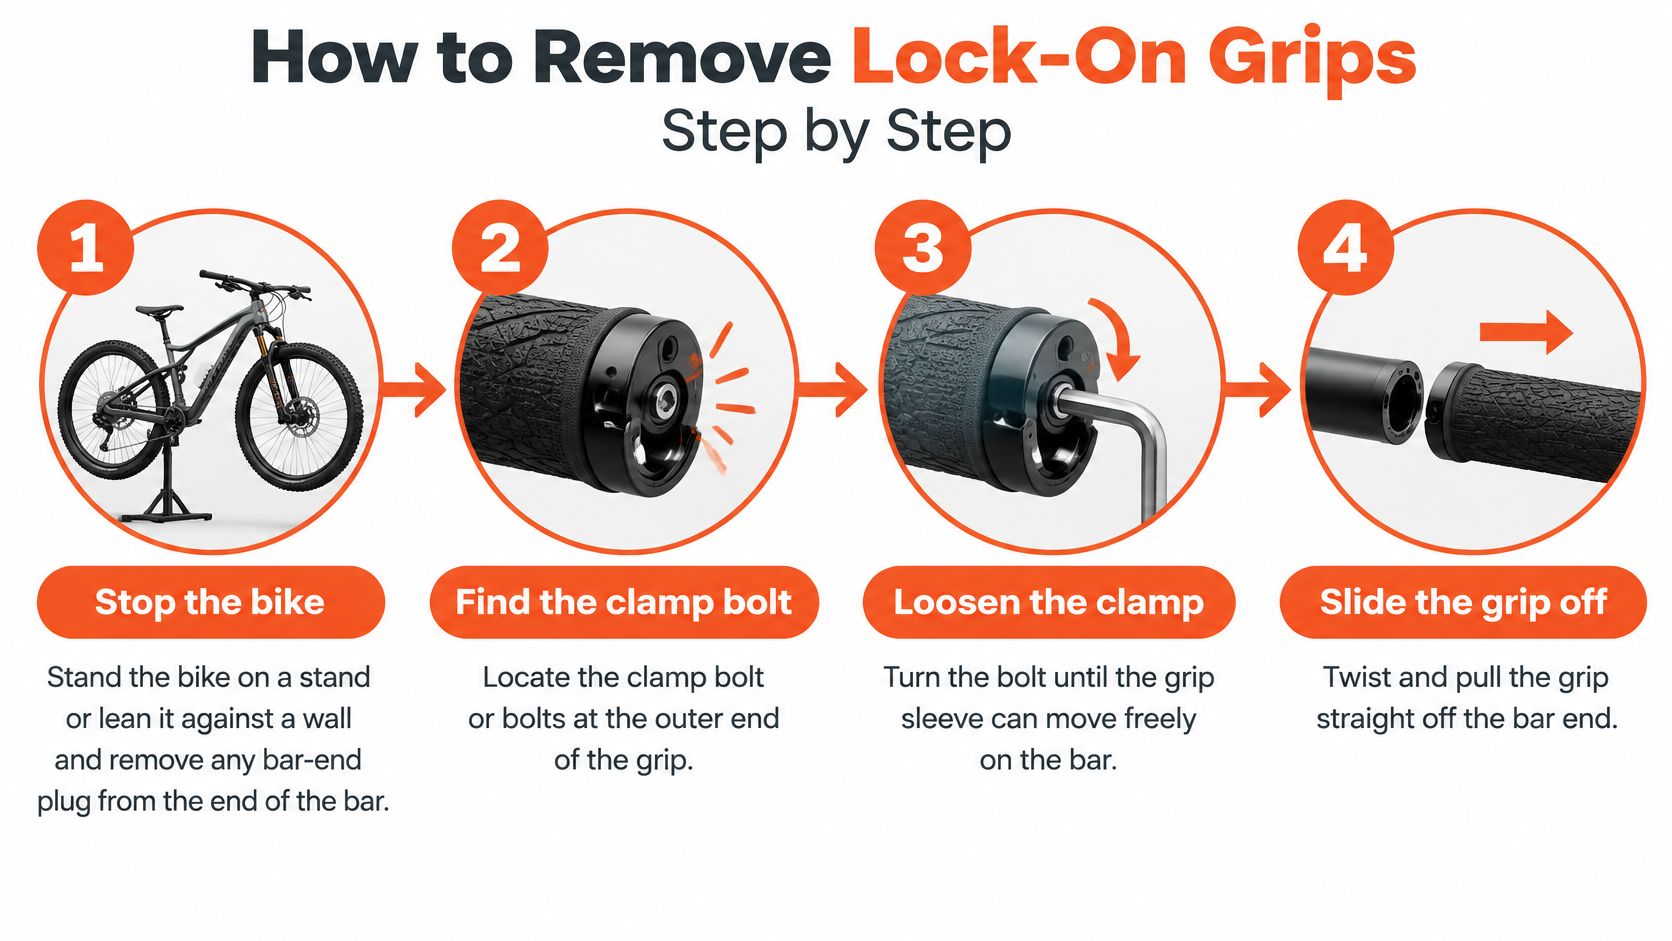
The Six Steps
- Stabilize the bike. Put it on a stand or lean it securely against a wall, then remove any bar-end plug so the grip has a clear path off.
- Find the clamp bolts. Look at the grip ends for one or two small bolts in metal collars. Some models hide a second bolt under the flange.
- Loosen each bolt gradually. Turn your 3 or 4 mm hex key a few turns rather than removing the bolt fully, so you don't drop hardware in the grass.
- Test for movement. Try sliding the grip. If it's still tight, loosen one more turn and test again instead of prying.
- Slide it straight off. Pull toward the bar end, keeping the brake lever and shifter clear of your hand path.
- Wiggle only if it sticks. Twist gently back and forth. Never lever a screwdriver against the bar to force it.
The Cycle Maintenance Academy grip removal guide is clear that you should remove the clamp screw first, commonly with a 3 or 4 mm hex key, because pulling before releasing the clamp can damage the grip or bar. That guide also notes there's no reliable published success rate for any removal method, so treat fixed percentage claims as unsupported. If someone guarantees a method works nine times out of ten, they're guessing.
Watch the full sequence here before you start, paying attention to how little force is needed once the clamp is loose.
Keep the Hardware Together
Tighten your focus on the bolts as they come out. An overtightened bolt can snap or strip if you wrench it unevenly, so if it resists, stop, reseat the key fully in the head, and turn slowly. Tape each bolt to its collar as soon as the grip is off.
Lock-on grips are usually reusable, which makes them worth removing carefully. Inspect the clamp threads and the plastic sleeve for cracks, then wipe the bar and check for scuffs where the collar sat. A clean, undamaged sleeve goes back on in minutes.
How to Remove Push-On Rubber and Foam Grips
Push-on grips have no clamp to release, so choose the removal method by grip material, whether you plan to reuse it, and the handlebar material. Start with the least risky method at the top of the table. Reserve cutting for grips you will discard.
| Method | Equipment | Risk to bar | Best for |
|---|---|---|---|
| Twist and pull by hand | None | Low | Loose or newly fitted grips |
| Wet release with isopropyl alcohol | Alcohol and a blunt plastic shim | Low | Most push-on rubber and foam grips |
| Water or window cleaner | Spray bottle and shim | Low | Silicone grips or when alcohol is unavailable |
| Compressed air at the grip end | Compressor or ball pump with nozzle, low controlled pressure | Medium, due to sudden ejection | Reusable grips with an existing opening |
| Lengthwise cut | Utility knife, shallow blade | High if the blade slips | Disposable grips only |
The table includes cutting as a fifth method. The illustration shows four methods that do not involve cutting, ranked from least to most risky.
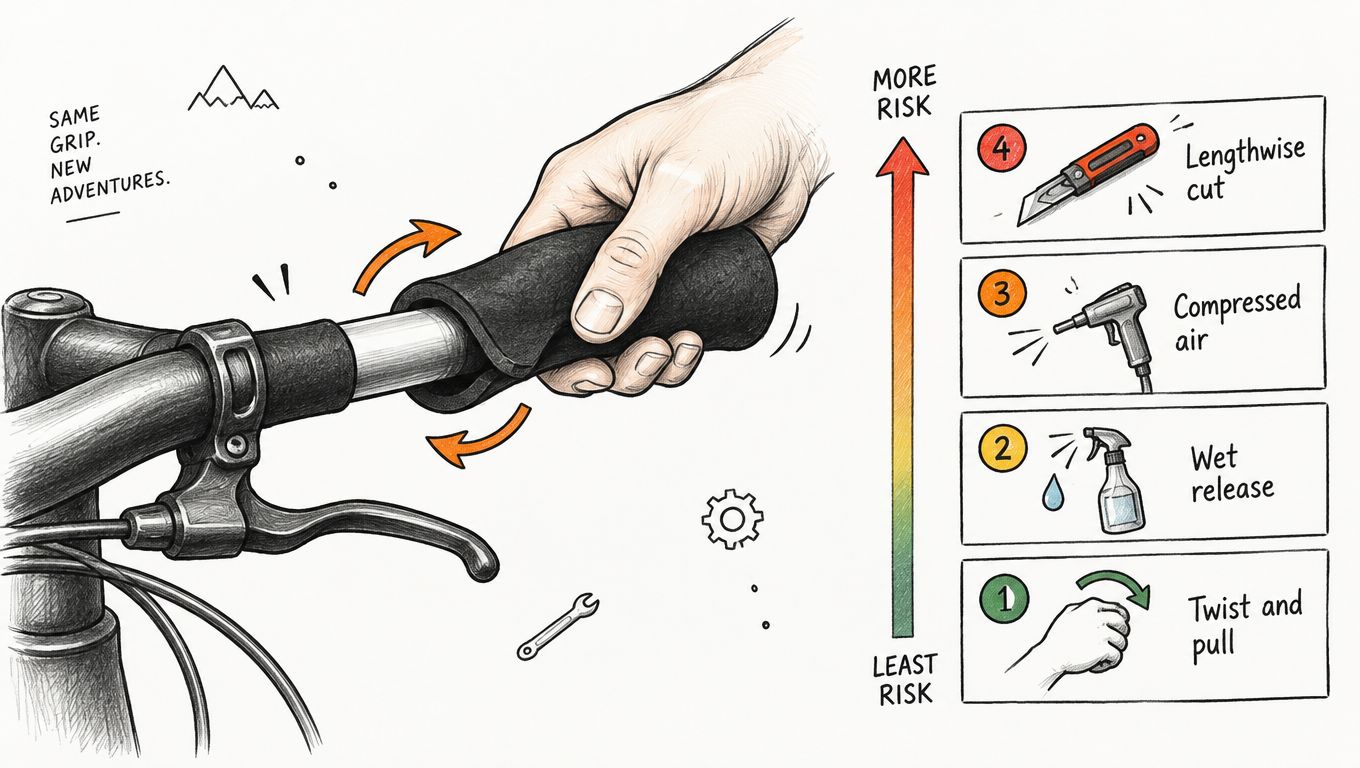
Wet Release Steps
- Remove bar-end plugs and stabilize the bike so it cannot roll while you pull.
- Lift one edge with a thin, blunt shim, opening only a narrow gap. Avoid twisting the shim against the bar.
- Apply a small amount of liquid through the gap, using isopropyl alcohol or water.
- Work around the circumference. Repeat at two or three more points so liquid can spread beneath the grip.
- Remove the shim and twist. Work the grip back and forth while pulling toward the bar end. This spreads force across the grip edge instead of loading one spot.
- Use air only if needed. Place the nozzle in the opening and apply short, low-pressure bursts while twisting and pulling.
A Reddit motorcycles thread on stuck grip removal describes the same basic wet-release sequence: open a narrow gap, apply alcohol or water, then twist the grip back and forth until it slides free. The thread also mentions zip ties as liquid channels, but that is anecdotal. Avoid forcing a tie under the grip, especially if you intend to reuse it.
Compressed air can lift the grip away from the bar, but a sealed grip may eject suddenly when the seal breaks. Keep your face out of its path, wear eye protection, and hold the grip securely.
If the grip still will not rotate after lubrication, do not move straight to more force. Adhesive or corrosion may be holding it, and extra pulling can tear foam or damage the grip. Add a little more liquid at the edge and work it inward gradually as you twist. Foam grips are especially easy to tear when you yank from one side, so use small movements and steady pressure if you want to keep the grip intact.
Handling Stuck, Glued or Disposable Grips
Pulling harder is the instinct that causes damage. If you've applied lubricant, twisted for several minutes, and the grip still won't rotate at all, you're probably fighting adhesive or corrosion, not simple friction. Extra force at that point tears rubber or scores the bar without solving the bond.
Diagnose Before You Cut
- Reapply and wait: Add isopropyl alcohol or water at two or three points around the edge, then wait a few minutes for it to work inward.
- Check the ends: Look for a bonded edge, hardened glue squeeze-out, or rust staining where the grip meets the bar.
- Decide by intent: If you're keeping the grip, stay with wet release or take the bike to a shop. If it's disposable, cutting becomes reasonable.
Older bikes explain much of this variation. Sheldon Brown's bicycle glossary notes that by the late twentieth century, mountain-bike bars generally used a 25.4 mm (1-inch) clamp area and a 22.2 mm (7/8-inch) grip section, while road drop bars commonly retained a 23.8 mm (15/16-inch) grip section. Grip-area size, not stem-clamp size, determines how tight an old grip fits, which is why two bikes can fight you very differently.
Cut Only Grips You Will Discard
- Keep the blade shallow: Cut lengthwise along the grip with a utility knife, angled away from the bar and away from your supporting hand.
- Clear the controls: Keep the blade path away from brake cables and shifter housings. Peel the grip open rather than slicing deeper.
- Protect carbon: Use a plastic or wooden separator instead of metal, and check the bar maker's guidance before using any solvent on the surface.
After cutting, strip leftover adhesive with a solvent the bar maker allows, then inspect the finish closely. A shallow blade that stays in the rubber leaves the bar clean. A deep one leaves a groove you can't undo.
Stop if you find deep scoring on the bar. At that point I'd replace the grip set and let a shop judge whether the bar itself is still safe to ride.
Clean the Bar and Fit Your New Grips
Removal is only half the job. A new grip fitted over old residue will creep no matter how tight it feels on day one.
Work through this cleaning and inspection sequence before you fit anything.
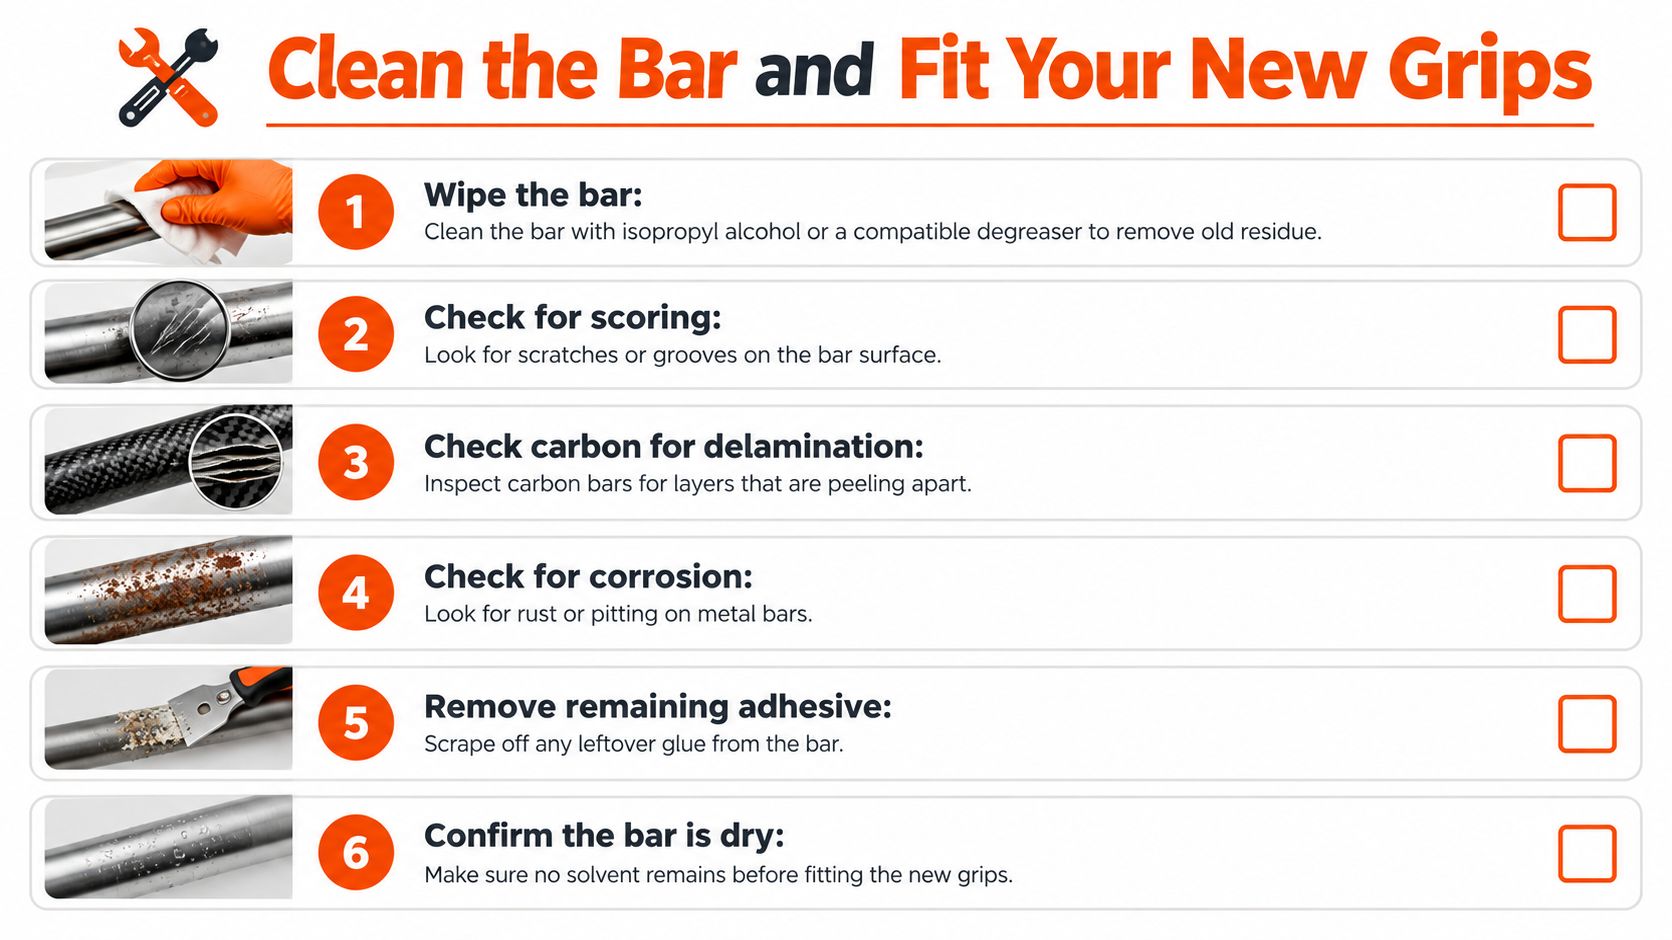
Wipe the bar with isopropyl alcohol or a compatible degreaser, then inspect for scoring, corrosion, remaining adhesive, and delamination on carbon, following the approach in Ergon's grip changing and installation guide, which directs you to clean and degrease the bar and inspect for scoring, delamination, corrosion, or residue before installing a replacement. Confirm your new grip matches your bar's grip area, 22.2 mm or 23.8 mm, before you open the packet. If you're still choosing, this guide to find the right handlebar grip fit helps you match diameter and style to your riding.
Fit and Final Check
- Dry the bar completely so no solvent sits under the new grip.
- Slide the grip on from the bar end with a small amount of lubricant the grip maker approves.
- Align it so the flange or clamp sits where your hand expects it.
- Tighten lock-on bolts evenly to the manufacturer's torque, alternating so the clamp seats squarely.
- Let it set before riding, so any lubricant dries or adhesive cures.
- Test it by twisting hard, pulling outward, and checking brake lever and shifter clearance.
Uneven clamp tightening lets one side bite while the other floats, and leftover residue acts like a slow lubricant. Both cause the same result, a grip that rotates mid-ride. Finish with a short roll down the street, twist each grip again, and only then head out properly.
If you run a bike shop or parts store fielding the same fit and removal questions every day, AgentStack can turn guides like this into an AI support agent that answers customers across your website, email, and Slack around the clock. It ingests your existing pages and documents, so riders get the right grip size and method before they damage a bar. Visit AgentStack to build an agent trained on your own workshop knowledge.